Table of Contents
- Introduction
- Live Video
- Camera Info Window
- Recording and Schedules
- Movie Playback (Browser)
- Camera Control
- Dashboard
- SecuritySpy as Remote Viewing Software
- Apple Home / Home Assistant Integration
- Access from iPhone, iPad, Apple TV and Android
- Setting up SecuritySpy for Autonomous Operation
- Optimising Performance
- Using External GPU Devices
- Achieving Effective Motion Detection
- Image Quality Review Window
- Screen Capture
- Settings
- Maintaining Camera Clocks
- Licensing
- Support / Help
Introduction
SecuritySpy is CCTV video surveillance software for the Mac.
With features such as AI-powered smart motion detection, email and iPhone alerts, ONVIF support and Pan/Tilt/Zoom control, SecuritySpy will enable you to set up a comprehensive and effective CCTV system for your business or home quickly and easily.
SecuritySpy can turn any Mac into a video surveillance station (for example, with multiple large screens in a security control room). It is also ideal for autonomous remote operation, as it has a fully-featured secure web interface that allows you to access and control your surveillance system over your local network or over the Internet. And, as Mac software, it is as elegant and easy to use as you would expect, with a carefully-designed user interface.

If you are building a video surveillance system from scratch, all you need is SecuritySpy, a Mac, and some IP cameras. If you have an existing system using analog cameras, SecuritySpy can use these alongside more modern IP cameras, allowing you to transition to a state-of-the-art digital system.
SecuritySpy's flexibility will allow you to set up a system that is tailored for your individual needs, whether you want a single camera or a hundred.
This manual describes how to use the SecuritySpy software itself. For information about how to choose, set up and install the hardware of your CCTV system, see the SecuritySpy Installation Manual.
The main features of SecuritySpy are:
- Displays and captures video from multiple cameras simultaneously
- Supports virtually all IP cameras (ONVIF, Axis, Vivotek, Canon, Dahua, Hikvision etc.)
- Separate Continuous and Motion Detection capture modes, for flexible recording
- Sophisticated AI-based motion and object detection using neural networks
- Built-in secure web server for remote viewing and administration
- Hardware-accelerated H.264 and H.265 compression for efficient storage of captured footage
- Pan/Tilt/Zoom (PTZ) support for network cameras
- FTP upload feature for automatic off-site backup of captured footage
- Motion-triggered email and iOS notifications
- Two-way audio support
- Pre-capture option, to capture video before the time of motion
- Synchronised multi-camera playback of captured footage
Initially, SecuritySpy will detect and display all local (USB, Thunderbolt and built-in) devices connected to your Mac. If you are using IP cameras, you can add them via Settings - Cameras. Setup instructions for IP video devices can be found in the SecuritySpy Installation Manual.
Live Video
Video Windows
SecuritySpy's main All Cameras window shows live video streams from all configured cameras in a grid view. You can also create Group windows that contain particular groups of cameras — useful in larger installations to organise cameras into logical collections.
In addition, each camera can be displayed in its own individual video window. You can open individual camera video windows from the Window menu, or by double-clicking on a camera's live image in the main video window or Group window, or by double-clicking on a camera name in the Camera Info window. All video windows can be resized to any shape and size by dragging any side.
SecuritySpy offers digital Pan/Tilt/Zoom control for any camera in any video window: hold the Command key (⌘) on your keyboard and scroll up or down on your mouse or trackpad (on a trackpad, use the two-finger gesture to scroll). Once zoomed in, release the Command key and scroll in any direction to pan around the image.
Here is a summary of the functionality of video windows:
Instant Replay
The instant replay feature keeps a buffer of frames from each camera in memory, which is available for instant playback or capture at any time. Because this feature can use significant RAM, it is off by default, but can be enabled via Settings - Display. To start an instant replay session, right-click on a live video image and select Start Instant Replay, or hold the Command key and scroll left on a live video image. During an instant replay session, the video window will look like this:
During the replay session, hold Command and scroll left/right, or click and drag the yellow indicator, to go backwards/forwards in time. Save individual images by dragging them to the Finder, or right-click for an option to save the entire buffer as a movie file.
Note that, during a replay session, the removal of old frames is suspended, but new frames are continually being added, so the longer a replay session continues the more RAM it will use.
Full Screen Mode
Enter full screen mode using the option in the Window menu, or by pressing Command-F on the keyboard. Each monitor attached to your computer becomes an independent full-screen display for whichever cameras you choose. The first time you enter full screen mode, SecuritySpy will add all available cameras to the full screen view; to change this, right-click (control-click) anywhere on a screen and a menu will pop up that allows you to configure which cameras to display on that screen.
In full screen mode, double-click any camera to view it individually. Double-click again to return to multi-camera view. Alternatively, use keyboard arrows: down to select a camera, left/right to switch between cameras, and up to return to multi-camera view.
Customising Display Layouts
Each video window, and each screen in full screen mode, is laid out in a grid in which each camera occupies one grid square by default. You also have the option of setting particular cameras to display at larger sizes - for example, a camera can be set to occupy three grid squares wide by two grid squares high. This can be set via the options in the contextual menu that appears when you right-click (or Control-click) a camera's live view:

Use the options Camera Display Width In This Window and Camera Display Height In This Window to set the size of each camera's live view. Each video window, and each screen in full screen mode, has its own independent layout that can be set in this way.
By default, SecuritySpy automatically chooses an optimum number of columns for the layout grid, based on the size of the window and the resolutions of the cameras. This can change as the window is resized; instead, to ensure that cameras remain in fixed positions, you can use the Number Of Columns In This Window option to set a fixed number of columns.
If the size you request for a particular camera would take its view beyond the right or bottom edge of the window, its view size is reduced to fit, so you will get a smaller size than you request. You can change the order of the cameras under Settings - Cameras (via the gear button below the list of cameras) to ensure that each camera has enough space to display at the requested size.
Here is a simple example showing two cameras displayed at double size:

Camera Info Window
This window is available by selecting Camera Info from the Window menu:

The Camera Info window shows a wealth of information about the operation of each camera:
- Name, as set under Settings - Cameras.
- Status: the letters C, M and A refer to Continuous Capture, Motion Capture and Actions modes respectively. Grey indicates that a particular mode is disarmed; orange indicates that the mode is armed but not actively doing anything (i.e. waiting for a motion trigger); red indicates that the mode is armed and doing something (e.g. recording or running an action).
- Motion: an indication of the amount of motion that is currently being detected in the camera's video stream - this turns red when the detection threshold is reached and a trigger is generated.
- Audio: this shows the current audio level. Click the speaker icon to play the live audio via the Mac's speakers. Additionally, if the camera supports two-way audio, click the microphone icon to speak and send that audio to the camera.
- FPS: the current frame rate of the video stream.
- Pixels: the resolution in terms of number of megapixels (MP).
- Size: the resolution in terms of pixels wide by pixels high.
- Data Rate: the amount of data being received per second.
- Duty: the percentage of time that some active processing is happening. This doesn't translate directly to CPU usage, since the processing may be elsewhere (e.g. GPU, Media Engine, Neural Engine), but this provides a direct comparison of resource usage between cameras.
- Loss: the percentage of data packets that have been lost during transmission over the network (ideally this will always be zero — if not, this indicates a network or camera issue).
- Video Format of the camera's video stream (e.g. JPEG, H.264, H.265).
- Audio Format of the camera's audio stream (e.g. PCM, μLaw, AAC).
- Hardware Video Decode Status: whether this camera's video decoding is being hardware-accelerated; also allows you to assign the camera to an External GPU (eGPU) for processing.
- Video Decoder Pressure, as measured by the size of the queue of video frames that are waiting to be decoded. If the queue becomes full, decoding will temporarily stop, resulting in missing chunks of live video, which will negatively affect video windows, web streaming, and motion detection. If you frequently see high decoder pressure, you should reduce camera frame rates.
- №: the camera number, which is a unique identifier used to refer to the camera, primarily via SecuritySpy's web interface.
To choose which columns to display, click on the header bar to get a pop-up menu that allows you to turn on or off each of the above items.
And, if you have set up camera groups, you will see a filter button in the top-right corner of this window that allows you to filter the list of cameras by group.
Recording and Schedules
In order to record video from a camera or for events to be triggered, the camera must be armed, and there are three modes that can be armed independently:
- Continuous Capture - video is captured continuously
- Motion Capture - video capture is triggered by motion detection
- Actions - emails, notifications, scripts and sounds, which are triggered by motion detection
Each mode (Continuous Capture, Motion Capture and Actions) is armed and disarmed based on a schedule, which defines time periods when that mode should be armed. You can set up your own schedules via Settings - Scheduling, or use the built-in schedules, which are:
- Armed 24/7 — armed all the time
- Disarmed 24/7 — disarmed all the time
- Armed Sunrise To Sunset — armed between sunrise and sunset (i.e. during the day)
- Armed Sunset To Sunrise — armed between sunset and sunrise (i.e. during the night).
Once a schedule has been applied to a camera mode, it will be permanently remembered, including across program restarts.
Schedule Overrides
It is sometimes useful to temporarily override schedules. For example, if you are getting lots of notifications due to some unusual activity in a particular camera, you can use a temporary schedule override to disarm Actions mode for one hour, to temporarily stop the notifications.
This can be best understood by the following diagram that shows the relationship between schedules, schedule overrides, and arming/disarming of camera modes:

Setting Schedules And Overrides
There are a number of ways to schedules and overrides for a particular camera, or group of cameras:
- In the Control menu there are options to set schedules for all cameras together.
- Right-click on a camera's live video feed in any video window, or on a camera name in the Camera Info window, to get a pop-up menu that allows you to set schedules and overrides for that camera.
- In the Camera Info window, and in the bar displayed above live video feeds, you will see C, M and A indicators
 that represent the three modes that can be armed (Continuous Capture, Motion Capture and Actions). Click on one of these indicators for a pop-up menu to select the schedule for that mode. These indicators are coloured as follows:
- Grey — disarmed
- Amber — armed but not recording or performing actions (waiting for a motion trigger)
- Red — armed and recording or performing actions
- Via the Schedule Setter window, which is available from the Window menu:
From this window, you can easily apply schedules and overrides to individual cameras, groups, or all cameras in one go.

Movie Playback (Browser)
SecuritySpy's Browser feature allows you to play back, export and manage captured footage. Choose Browser from the Window menu to open the Browser:

Select one or more cameras and specify a date, and the Browser will display all files matching these criteria. The main components of the browser are:
Date Control
For the date you specify, the Browser displays all footage captured during that day. Click the calendar icon to get a pop-up graphical calendar, which makes choosing the desired date much easier.
Camera List
This list shows all active cameras in SecuritySpy. Select up to six cameras to view footage from them all, synchronised together. To select multiple cameras, Shift-click or Command-click entries in the list.
File List
This lists all files that have been captured by all selected cameras on the selected day. This list has the following functionality:
- Select a file in this list to jump to its start in the timeline.
- Double-click a file to start playing it.
- Alt-click (Option-click) to start from the time of first motion detection.
- Hover the mouse over a file for a quick preview.
- Right-click to set colour tags.
- Drag files to the Finder to copy them.
Timeline
The timeline shows a graphical representation of time periods during the day that have captured video footage for each selected camera. Click anywhere in the timeline to change the current cursor time, and click and drag left and right to scrub backwards and forwards through the video footage. Hold the shift key on the keyboard while dragging the timeline cursor to select a time period, which you can then export.
For fine time control, hold the Command key and scroll left/right on your mouse or trackpad.
Any files captured since the last scan will be added in red, indicating that they have not yet been queued for display in the movie area. To play these files, use the Rescan option in the Browser menu (see below) to add them to the movie display.
Files in the trash are showed in grey, but will still be playable until you empty the trash.
Bookmarks
Bookmarks appear as red triangles at the top of the timeline, and are useful for marking the time of interesting events in captured footage:

To create a bookmark, double-click at the top of the timeline. Right-click (control-click) on an existing bookmark, or anywhere in the timeline, for a pop-up menu with options to create, edit, delete or jump to a bookmark. Each day has its own set of bookmarks, which are saved permanently.
Movie Area
This is the area that actually displays the captured footage. If you have selected multiple cameras, they will be displayed in a grid, in the most optimal arrangement for the size of the Browser window and the resolution of each selected camera.
Advanced Movie Search
For any camera that has the appropriate Movie search metadata options enabled under Settings - Cameras - Detection, the Advanced Search feature (available from the pop-up menu at the top of the Browser window) can be used to find events in the recorded movie files. Select the Advanced Search option and a panel appears that allows you to set search criteria:

Click and drag in each camera's image to define search areas, and specify whether you want all motion events, or specifically events where a human, vehicle or animal has been detected. Click the Search button, and the Browser will list all events that match the specified search criteria:

Clicking on an event in the list on the left moves the timeline to that point in time, and a red box will be overlaid on the video footage of the relevant camera to highlight the location of the event.
JKL Control
The Browser also supports JKL keyboard shuttle controls: pressing L causes the playback to speed up in the forward direction by a factor of 2, J causes the playback to speed up in the reverse direction by a factor of 2, and K pauses the playback.
Next/Previous Event
Press the tab key to jump to the next event, or Shift-tab to jump to the previous event.
Zoom In/Out Video Playback
To zoom in or out of the captured footage during playback, hold the Command key (⌘) and scroll up or down on your mouse or trackpad (on a trackpad, use the two-finger gesture to scroll). Once zoomed in, release the Command key and scroll in any direction to pan around the image.
Browser Menu
The Browser menu in the menu bar contains the following options:

Export File
This option allows you to export any file that is currently selected in the file list. The video and audio data is copied directly to the exported file, so there is no loss of quality.
When exporting a file, you have the option to set the playback frame rate. In this way, you can create timelapse movies that play back at much faster speeds than real-time. Note that doing so will remove any audio track in the movie.
Export Selection
Make a selection in the timeline by dragging the cursor while holding the shift key. Then, for any camera that is currently selected in the camera list, this option allows you to export the video footage contained within the selected time period. The video and audio data is copied directly to the exported file, so there is no loss of quality.
Export Current Frame
For any camera you have selected in the camera list, this option allows you to export a still image from the current time as a JPEG file. This option is available only if there is some valid footage for the specified camera at the current time.
Rescan
This rescans files for the currently-selected camera(s) and date. This is useful for adding to the movie display any files that have been captured since the last scan, in order to play them.
Reveal in Finder
This option tells the Finder to show all the files that are currently selected.
Move to Trash
This moves all selected files to the Browser's trash. The Browser keeps its own trash, separate from the Finder's trash.
Empty Trash
Use this option to permanently delete all files in the Browser's trash.
Zoom In/Out Timeline
Use these options to zoom in or out in the timeline view. Zoom in to see the position of time objects in detail, or zoom out to get a more general picture of captured footage throughout the day.
Camera Control
For each camera, SecuritySpy offers a Camera Control window that allows you to:
- Issue Pan/Tilt/Zoom (PTZ) commands
- Set PTZ settings like auto-patrol and preset names
- Adjust image settings such as brightness, contrast, sharpness and focus.
To open a Camera Control window, click the button (with icon ![]() ) in the title bar of video windows, or right-click on a camera and select the Control Camera… option, or hold the alt/option key on the keyboard while double-clicking a camera's live image.
) in the title bar of video windows, or right-click on a camera and select the Control Camera… option, or hold the alt/option key on the keyboard while double-clicking a camera's live image.
Note that cameras typically require administrator access for these controls, so make sure these details have been entered correctly under Settings - Cameras - Device. Non-admin accounts, for simply viewing live video, may not be sufficient for camera control.
PTZ
Under this section, you can control the camera's pan/tilt position and zoom level:

The controls act as virtual joysticks, allowing you to control direction, as well as speed of movement for cameras that support variable-speed movement (the further you move the blue indicators from the centre of their respective control areas, the faster the movement).
Preset buttons will be available if your camera supports this feature. To save the current camera position, hold the alt/option key and click a preset button. The Home position cannot be changed as it is set by the manufacturer.
Keyboard shortcuts: use the arrow keys to move the camera, or the numeric keypad if available (1 moves down-left, 2 moves down, and so on). On cameras with variable-speed movement, hold alt/option to move faster. Press a number key (at the top of the keyboard) to recall a preset, or hold alt/option while pressing a number key to save a preset.
These keyboard shortcuts are also available directly in video windows: first, click once on a camera's live view to select it, enable shift or caps lock, then use the keyboard shortcuts.
Mouse shortcuts: enable shift or caps lock, and click directly on a camera's live view towards one of the edges to move it in that direction. On cameras with variable-speed movement, clicking further from the centre causes faster movement.
Settings
This section contains settings related to PTZ:

Here you can name each preset, set up auto-patrol, and adjust the movement speed (if your camera supports variable-speed movement).
Select which presets to include in auto-patrol using the checkboxes on the right, and choose your preferred delay — the number of seconds between automatic movements.
To start auto-patrol, click the play button (►) in the PTZ section. A menu pops up that lets you choose the schedule that defines when auto-patrol is active. As well as the built-in schedules (24/7, Sunrise To Sunset, Sunset To Sunrise), any custom schedule you create under Settings - Scheduling - Schedule is also available here.
During scheduled periods, the camera automatically cycles through the selected presets. If you move the camera manually during this time, auto-patrol is temporarily suspended and resumes automatically 20 seconds after the last manual input.
Image
Here you will find controls related to camera imaging:

These controls are available for ONVIF cameras only, and support varies between cameras; if an item here is unavailable, this means that the camera does not support its adjustment.
Any changes to these image controls are set permanently in the camera.
Window Position
By default, each Camera Control window will open directly under the current mouse position. Instead, if you want these windows to remember their positions, you can enable the option for this under Settings - Display.
Dashboard
The Dashboard window displays various performance metrics, which allow you to monitor the daily operation of your SecuritySpy system and spot any potential problems. Choose Dashboard from the Window menu to open the Dashboard:

The main performance measures available are as follows:
- CPU Usage (Total) - the overall utilisation of your Mac's CPU. If this regularly exceeds 90%, this indicates that your Mac's CPU is overloaded, and you should reduce the camera frame rates, or upgrade to a faster Mac.
- CPU Usage (Per Camera Per Core) - how much time of each core of the Mac's CPU is being used for which camera. This is useful to compare different cameras, to see which ones are using the most CPU resources.
- Incoming data rate - the rate of data being received from each camera.
- Recording data rate - the rate of data actually written to disk for each camera.
- Memory Pressure - how much stress the Mac's memory (RAM) is under. Frequent memory pressure of 50% or more indicates that your Mac lacks memory, and you should install more.
- Disk Pressure - how much stress each disk is under. Frequent disk pressure of 50% or more indicates that a disk is too slow, and should be replaced with a faster disk, or the recording settings should be changed to reduce the recording data rate.
- Packet Loss - the percentage of data packets sent by each camera that are lost in transmission. Anything above zero indicates a problem, as packet loss will result in corrupt video. For any camera exhibiting frequent packet loss, its network connection should be checked, or it should be replaced.
The Smoothing slider controls how much smoothing is applied to the data for display: low values give you more detail whereas higher values make it easier to see the overall shape of the data.
Dashboard data is kept for 30 days before being automatically purged.
SecuritySpy as Remote Viewing Software
You can use one instance of SecuritySpy running on one Mac to view live video from cameras streamed from another instance of SecuritySpy running on a different Mac. In this way, you can use SecuritySpy as client viewing software, providing a better user experience for live video than viewing via web browser. For this purpose, SecuritySpy can be used free of charge in its unlicensed state.
To set up one Mac (the server) to transmit live video to another Mac (the client):
On the server Mac- Enable SecuritySpy's web server feature in the Settings - Web window.
- For connections over a local network, make sure that the Advertise this web server via Bonjour option is enabled, so that the client computer can automatically find the server.
- For connections over the internet, set up access to the server over the internet as per the Remote Access section of the SecuritySpy Installation Manual. This will provide you with your own DDNS domain name (e.g. example.viewcam.me) with which to access the server over the internet.
There are two ways to add cameras to the SecuritySpy client instance:
On the client Mac: adding all cameras in one go- Go to Settings - Cameras, click the plus (+) button at the bottom left, and select Add All Cameras From SecuritySpy Server.
- If you are connecting over a local network, click the Bonjour menu to the right of the Address field and select the server computer; if you are connecting over the internet, enter the DDNS address you created above (e.g. example.viewcam.me).
- If you have enabled password protection on the server, enter the username and password.
- If you are using standard ports (8000 and 8001) you don't need to enter a port number.
- Click OK, and all cameras will be added:

- Go to Settings - Cameras, click the plus (+) button at the bottom left, and select Add Network Device.
- If you are connecting over a local network, click the Bonjour menu to the right of the Address field and select the server computer; if you are connecting over the internet, enter the DDNS address you created above (e.g. example.viewcam.me).
- Select SecuritySpy as the device profile, and, if you have enabled password protection on the server, enter the username and password.
- For the Format setting, the H.264 RTSP option is generally the best one to use.
- Select a stream number that corresponds to a camera number on the server.
Notes:
- Each viewing instance puts additional processing load on the server. You can minimise this load by specifying a low frame rate in the above window.
- This method of remote viewing allows you to access only the live video from the server, not recorded files.
Apple Home / Home Assistant Integration (macOS 11 or later)
Apple Home is Apple's home automation system, while Home Assistant is a very popular open source system. Both allow control of a wide range of smart devices such as lightbulbs, power sockets and door locks. SecuritySpy integrates with these systems via a free bridge app called HomeHelper, which must be installed on the same Mac running SecuritySpy - download HomeHelper here.
![]()
HomeHelper
In HomeHelper, you set up Triggers and Actions, each containing a set of rules for home devices:

Triggers define rules that initiate Motion Capture and Actions in cameras based on changes to the state of home devices (e.g. a PIR motion sensor initiating recording in a camera). You can add multiple devices to each trigger; a change in any of them will invoke it. For example, the following trigger is invoked when either of two power sockets turns on:

HomeHelper Triggers can be set for cameras under Settings - Cameras - Motion Capture and Settings - Cameras - Actions, and for schedule presets under Settings - Scheduling - Schedule Preset.
Actions define rules for setting the state of home devices in response to SecuritySpy events (e.g. motion detection in a camera causing a light to turn on). Multiple devices can be added to each action, so that one action can make multiple changes. For example, the following action will turn on two lamps, and then reset them to their previous states after a short time:

HomeHelper Actions are set for cameras under Settings - Cameras - Actions.
Status indicators
Indicators at the bottom left corner of the HomeHelper window show its connection status to SecuritySpy, Apple Home, and Home Assistant.
Account requirements
For Apple Home, simply sign into iCloud on the Mac that is running SecuritySpy and HomeHelper.
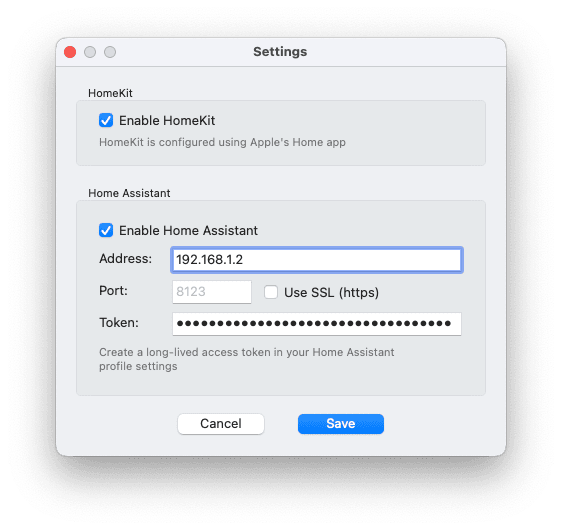
For Home Assistant, generate an access token like this: click your profile icon at the bottom-left corner of the Home Assistant web interface, select the Security tab at the top, and use the Create token button in the Long-lived access tokens section. Go to HomeHelper's Settings window, and enter the IP address of the Home Assistant server and the access token:
Managing home devices
To add, remove or rename devices, use Apple's Home app or the Home Assistant web interface.
HomeHelper must stay open
In order to function, HomeHelper must be open and visible, but it can run quietly in the background. SecuritySpy will open and close HomeHelper automatically as necessary.
Why is this a separate app?
On macOS, apps can only access Apple Home via the Mac Catalyst framework, which allows iOS apps to run on macOS. A normal macOS app such as SecuritySpy cannot access Apple Home directly. Additionally, apps that use Apple Home must be distributed via Apple's App Store, which is a limitation that we don't want to impose on SecuritySpy itself. HomeHelper has therefore been implemented as a separate Mac Catalyst app to satisfy these requirements.
Access from iPhone, iPad, Apple TV and Android
In addition to the built-in web interface, which can be viewed in any web browser such as Safari or Google Chrome, SecuritySpy also offers various mobile apps, allowing you to view your system from your phone, tablet or TV. For more information, visit SecuritySpy Mobile Apps.

Setting up SecuritySpy for Autonomous Operation
Here are the steps we recommend to set up your SecuritySpy system to operate autonomously:
Automatic login
Make sure that Automatic login is enabled in the Users & Groups system settings.
Click and hold the mouse button on the SecuritySpy icon in the Dock. From the menu that pops up, select Options > Open at Login:

Prevent Mac sleep
Under Settings - General, make sure the option to Allow automatic computer sleep is turned off (it's off by default).
Crash recovery
Under Settings - General, make sure the option to Reopen automatically after a crash is turned on (it's on by default).
Power failure recovery
Open System Settings, click the Energy Saver item, and enable the option Start up automatically after a power failure (this option may not be available on all Macs).
Prevent disk sleep
Open System Settings, click the Energy Saver item, and disable the option Put hard disks to sleep when possible (this option may not be available on all Macs).
Startup schedule
Setting a schedule to automatically wake/start the Mac every day provides automatic recovery from a situation where the Mac has been turned off or put to sleep manually. This can be set by the following Terminal command:
sudo pmset repeat wakeorpoweron MTWRFSU 8:00:00
Remote access
This allows you to access and administer your system remotely - see Remote Access.
Notifications of system downtime
Use the option under Settings - Email to send you email notifications of any downtime, so that you can promptly resolve any problems.
For added security, enable the login screen
Invoking the login screen helps to prevent unauthorised access to your Mac. You can achieve this when your Mac first starts up, by following the instructions in this FAQ: Can SecuritySpy run behind the login screen?, and you can set your Mac to automatically go to the login screen upon display sleep, via the Security & Privacy system settings.
Optimising Performance
Using multiple cameras simultaneously involves moving, calculating and storing large amounts of data. Here are some tips to get the most out of your system:
- Under Settings - Cameras - Device, leave the Recompress Video Data option turned off, unless you have a good reason to enable it. Leaving this option off means that you won't be able to use SecuritySpy's text overlay and transformation features - instead, these should be enabled directly in the camera if required.
- Under Settings - General, leave the Allow automatic computer sleep option turned off - SecuritySpy cannot operate when your Mac is sleeping.
- Disable hard disk sleep in the Energy Saver system settings if you get movie files with a long pause at the beginning. If the hard disk is sleeping, frames will be lost at the start of the next capture due to the time taken to spin up the disk (this only applies to mechanical hard drives, not to solid state drives).
- Close live video windows when you are not using them. Live video display can use significant CPU and GPU resources, especially on older Macs. To achieve this automatically, use the option under Settings - Display to Auto-close video windows.
- Set each camera to the frame rate you require and no higher (10fps should be sufficient for most general-purpose CCTV systems).
- A fast hard drive is likely to improve performance, depending on the number of cameras capturing simultaneously and the compression settings used. Connect external drives by USB 3.1 or Thunderbolt where possible (though USB 3.0 also offers plenty of speed for most systems when using Motion Capture recording). Do not use Fusion drives (combined SSD+HDD) or NAS (Network Attached Storage).
- Under System Settings - Sharing, make sure the "Content Caching" option is turned off. This can use significant storage space, which can compete with SecuritySpy's disk usage.
- When using AI-based object detection, follow our guidance about Achieving Effective Motion Detection. The AI can use significant system resources, so the more false-positive triggers that can be prevented by the first-line standard motion detector the better.
- By default, SecuritySpy attempts to use hardware acceleration to decode incoming video data. This minimises CPU usage, and is the optimum configuration for the majority of systems. However, for systems with large numbers of cameras and/or high resolutions and frame rates, this can overwhelm the hardware decoding abilities of your Mac. Check the Video Decoder Pressure indicators in the Camera Info window to see if your system is struggling to keep up with hardware decoding. If so, see this FAQ about decoder overload for information about how to mitigate this situation.
Using External GPU Devices
(Intel Macs only)
Video Decoding
For most systems, video decoding is the most resource-intensive task that SecuritySpy needs to do. Modern Macs can decode multiple simultaneous video streams via their built-in hardware modules (located variously in the CPU, GPU, or T2 chip, depending on your particular Mac model), but there is a limit to this capability, and when exceeded, your system may suffer from uneven live video and less effective motion detection (in this case, SecuritySpy writes a message to the log file to this effect, which you can check via the Open Log option in the File menu).
There are a few solutions to this. The first is to lower the frame rates of your cameras until the problem is no longer apparent. Another is to assign some cameras to software decoding rather than hardware decoding (software decoding uses the Mac's standard CPU cores, which takes pressure off the decoding hardware, but will significantly increase CPU usage).
Alternatively, if you don't want to reduce frame rates or increase CPU usage, then adding an External GPU device (eGPU) can be a good solution. Supported eGPU devices are described in Apple's document Use an external graphics processor with your Mac.
To assign a camera's decoding task to an eGPU, click the indicator shown in the Hardware Video Decode Status column in the Camera Info window (if you don't see this column, click on the header bar at the top of the window that shows the column names for an option that allows you to add it), and you will see a menu like this:

This allows you to assign each camera's video decoding task to your Mac's internal hardware, external eGPU hardware, or software CPU decoder. If, for any reason, the eGPU cannot be used, SecuritySpy will fall back to internal hardware decoding. The status indicators shown in the Camera Info window are as follows:
![]() An internal hardware decoder is being used
An internal hardware decoder is being used
![]() An external hardware decoder is being used (eGPU) *
An external hardware decoder is being used (eGPU) *
![]() The CPU is being used because there are no hardware decoding resources available
The CPU is being used because there are no hardware decoding resources available
![]() The CPU is being used because it was selected by the user
The CPU is being used because it was selected by the user
* The eHW indicator is shown on macOS 10.15 and later only. On older systems, this information is not available to SecuritySpy, so the HW indicator will be shown instead. In this case, you can use other means to check eGPU usage, such as Activity Monitor.
Video Encoding
Encoding will be performed when recording from any camera that has been specifically set to recompress video data under Settings - Cameras - Device, and for video streams generated for sending via the web interface. SecuritySpy will automatically distribute encoding tasks across all available internal and external hardware.
Achieving Effective Motion Detection
SecuritySpy's motion detection algorithms are highly accurate under a range of conditions, however there are a few things that you can do to ensure that high-quality data is passed to these algorithms in order to give you the best possible results:
Camera angle
How you position the camera, as well as the focal length of the lens (how wide-angle it is) makes a big difference to the effectiveness of motion detection. The key points to consider are:
- The activity you want to capture should be relatively large in the frame. A camera with a very wide-angle lens is appropriate for very close subjects (e.g. at a doorway capturing approaching people), but more distant subjects may be too small to trigger motion detection or clearly resolve important features such as faces.
- Point the camera downwards and don’t include any sky in the frame, otherwise the sun may glare into the camera, impairing its ability to render the scene with good enough definition, and maybe even damaging its sensor.
- Include in the frame only the relevant area that you want to monitor.
 |  |
| Bad: the lens is too wide, so the details of the cars are difficult to make out, let alone people; lots of sky is included; and unless you want to capture boats, the large area of water on the left is a waste of pixels. | Good: the lens has the perfect length to capture just the area under surveillance, so that the people are large enough in the frame both for effective motion detection and for distinguishing facial features. |
Items in the scene
In outdoor locations, the scene should be free from items that can move in the wind, such as flags, hanging lights/ornaments, fabric garden furniture and so on. Also make sure there are no lights that shine brightly into the camera, as this causes glare and exposure issues.
Mounting
It is vital that the camera itself does not move, as this would significantly compromise motion detection accuracy. Mount cameras securely onto solid objects such as buildings or walls. Avoid mounting cameras on trees or poles that can sway.
Always mount cameras directly in the area being monitored, without windows or mesh screens between them and their view. Windows reflect light back into the camera, causing severe glare and flare. Screens significantly degrade image quality and interfere with SecuritySpy's AI object detection capabilities, rendering these advanced features ineffective.
Lighting
In low-light conditions, cameras can produce significant noise. This is because the camera has to boost the signal from the sensor in order to produce a bright enough image, which also boosts the noise. Here is an example of what this looks like up close:

In a noisy image, the detection threshold for real motion has to be increased, so that it will take a lot more movement than normal to trigger motion detection. This results in real events being less likely to be detected (i.e. more false negatives).
The solution is to install better lighting for the scene you want to capture – either visible or infra-red (if your camera is IR-sensitive).
Many cameras have built-in infrared LEDs for night vision. These work fine in limited circumstances, however they are typically not very effective beyond a few meters. They also have a further disadvantage when used outdoors in that they tend to attract insects, which fly around the camera, brightly lit by the IR light, triggering motion detection. You will get far better results if you use separate IR or visible light illuminators mounted some distance from the camera, which are typically also much more powerful.
Compression settings
Video from IP cameras is compressed, typically to H.264 or H.265 format. With the right compression settings, these formats can provide very high quality, but with the wrong settings they can cause unacceptable image degradation. Here is an example of low-quality H.264 compression:

There are a number of parameters that can be set in your camera to control compression quality:
- CBR (Constant Bit Rate) compression produces a fixed amount of data per second, and tends to be what most cameras are set to by default. For complex scenes with a lot of movement, which would otherwise need more bits to encode accurately, this bit rate restriction can result in the camera reducing its compression quality to unacceptable levels, thereby introducing the kind of artefacts shown above.
- VBR (Variable Bit Rate) is a much better mode to use, as it does not suffer from this problem. With VBR, the compressor will use more bits as required, in order to encode the scene accurately.
- Quality setting (available in VBR mode only): the higher this setting, the higher visual quality you get, at the expense of a higher data rate. Typically a medium-to-high value, or 60 on a 1-100 scale, will give good results, though this does vary between cameras so you may have to experiment a bit.
- I-frame interval / GOV Length / Key frame rate: this specifies how often the video stream contains I-frames, which are self-contained frames that encode the entire image. Between I-frames there are multiple P-frames (delta frames), which contain only the changes in the image since the last frame. A good value for this setting is to have an I-frame every 2 seconds or so (so if the frame rate is 10fps then an I-frame interval of 20 is good).
Frame rate
For reliable motion detection, ensure your cameras stream at a minimum of 6 fps. Cameras operating below this rate will experience reduced detection accuracy. Higher frame rates will not improve detection accuracy, as the system is optimised to process motion at 6 fps, which is the rate that provides maximum accuracy.
Masking (configurable at Settings - Cameras - Detection)
Setting a mask to ignore certain parts of the video image is an effective way to reduce false-positive triggers. Typically you will want to mask out objects that move in the wind (e.g. trees and plants), or areas where you are not interested in detecting motion. However, make sure that you do not mask out more than necessary – the algorithm works best when it has plenty of pixels to work with.
 |  |
| No mask - activity anywhere in the image will be detected | A mask to ignore motion in the road and motion caused by the tree |
Motion detection method (configurable at Settings - Cameras - Detection - Advanced)
SecuritySpy defaults to AI-powered motion detection for as many cameras as possible, providing far greater accuracy than standard pixel-based detection. Apple Silicon Macs can apply this to all cameras thanks to their built-in Neural Engine, while Intel Macs will allocate the AI based on available system resources. If you experience performance or accuracy issues on Intel Macs, you may want to manually specify which cameras utilise AI detection. Be aware that older Intel models may experience significant CPU usage when running the AI motion detector.
Motion sensitivity (configurable at Settings - Cameras - Detection - Advanced)
The default setting is designed to be optimum for most circumstances, but this can be adjusted upwards if you are seeing too many missed events from a particular camera, or downwards if you are seeing too many false-positive detections.
Further considerations for AI-based object detection
The above advice applies whether you are using the AI-based object detection features or not, as images still go through the normal motion detection algorithm first before they are passed to the AI for further processing. The main thing to be aware of is that computer vision algorithms work far better on high-resolution, clean, clear images than low-resolution, noisy, cluttered ones. Specifically:
- It is important to ensure that there is good lighting that illuminates the whole scene, whether this is visible or infra-red lighting (if the camera is infra-red sensitive). This not only reduces noise, but makes objects clearer and therefore more likely to be recognised by the AI.
- Set the camera with a minimum shutter speed to avoid the blurring of moving objects: 1/50s is usually sufficient for people, or 1/100s for vehicles or animals.
- The higher the resolution the better; 2 MP (1080p) should be considered the minimum.
- Make sure the camera's orientation is correct so that objects don't appear at odd angles.
- A clean, uncluttered environment will yield higher accuracy than a messy, cluttered one.
- Vehicle detection can only be used in areas where there are no parked vehicles. The AI is very good at recognising a vehicle, but cannot distinguishing between a moving vs. stationary one.
- Animal detection is inevitably a bit less accurate than vehicle or human detection, because animals tend to be small and fast, so can appear as indistinct blurry blobs in less than ideal conditions (e.g. in low light, or from low-resolution cameras) - for accurate animal detection, it is especially important to ensure high-quality images from your cameras by using high-resolution cameras and good lighting.
- If you wish to detect smaller animals, a camera mounting position closer to the ground than usual (e.g. 1m/3ft) will work better, as this will help to capture more useful details of the animals than a top-down view would.
AI Review window
If you are seeing unexpected results from AI object detection, this is usually due to particular objects in the scene that look similar to the objects of interest, or camera/lighting deficiencies that are causing image quality issues. Firstly, tell SecuritySpy to collect these images by enabling the option to Save all AI-classified images for future review under Settings - General. Then, to review the results that are being generated, open the AI Review window, which is available from the Window menu:

This shows classification results over the last 24-hour period, and should allow you to identify the source of any inaccurate detections. For any image that is clearly wrong, please submit it to us by right-clicking on the image and marking it as incorrect. The more submissions we get from users, the better we will be able to improve our algorithms in future software updates.
Image Quality Review
Available from the Window menu, this function assesses the quality of images from your cameras, helping you identify problems and make necessary adjustments to achieve the most effective results from each camera.

Representative day and night images are automatically captured daily and analysed for key metrics:
- Resolution - 4 MP is adequate; 8 MP is ideal.
- Sharpness - poor optical systems, incorrect focus or insufficient light can cause blur.
- Noise - common in low-light conditions, this can often be reduced by improving lighting.
- Exposure and contrast - if flagged as issues, adjust these in the Camera Control window or directly through the camera's web-based or app settings.
- Overall score - a rating out of 10 that incorporates all measurements. Hover your mouse over an image to see the detailed breakdown.
Screen Capture
Under Settings - Cameras, click the plus (+) button at the bottom left of the window, and you will see options to add one of your Mac's screens. Any screen can be added as a video input source, as though it were a stream from a camera.
Screen capture can be resource-intensive, so keep the frame rate low, especially for high-resolution screens (this can be configured under Settings - Cameras - Device).
Settings
The Settings window contains all settings for the software, and is organised as follows:
- General — general-purpose options, maintenance and performance
- Display — live video display, configuration of groups
- Scheduling — weekly schedules for arming camera modes
- Storage — disk selection, file removal, archiving
- Compression — video and audio encoding
- Uploads — off-site backup of recordings
- Email — sending options, error reporting
- Web — built-in web server configuration
- Cameras — add, remove and configure cameras
Note: changes to settings are not applied immediately as you interact with the controls in this window, because this could interrupt recordings that are currently taking place. Instead, you must click the Save button at the bottom of each settings page to apply any changes you make.
Settings - General
This section contains general-purpose settings to configure the software:

System name
Specify a name that will allow you to easily identify your CCTV system. This name is used for the web interface (e.g. shown by web browsers when asking for authentication),
in our SecuritySpy mobile apps,
and in subject lines of emails.
Restart automatically after a crash
SecuritySpy is very stable and crashes are rare. However, complex applications can occasionally encounter issues, sometimes from system components or third-party drivers. When enabled, this option launches a background monitor that watches SecuritySpy and automatically restarts it if it unexpectedly quits. During video capture, at most a few minutes of footage would be lost.
Allow automatic computer sleep
The computer must be awake for SecuritySpy to operate, so if you want continuous operation you should leave this option turned off. Use this option if you would like the computer to sleep automatically when it is not being used (as per the settings in the Energy Saver system settings).
Dismiss alert messages after 1 minute
When enabled, all alert messages (such as error messages) will be closed after 1 minute. This option should be enabled if the computer is to be left unattended.
Display window for important error messages
Use this option to have a window appear on the screen to inform you of any major errors (these include problems preventing SecuritySpy from obtaining video streams, or recording problems).
Share diagnostic information
When enabled, SecuritySpy will send information back to us, the developers of the software, once per day, to help us diagnose problems and improve the software. This includes system setup information, error reports and performance data. This data is sent over an encrypted connection, and we will never share this data with third parties.
Share anonymous images
When enabled, SecuritySpy will send images back to us when motion is detected. By analysing and categorising these images, we can use them to improve SecuritySpy's motion-detection features. The images are scaled down to a small size and are sent infrequently over an encrypted connection, so the transmission is secure and uses very little bandwidth. Apart from the content of the images themselves, no identifying data is sent along with these images.
Save all AI-classified images
When enabled, all images that have been classified by the AI object detector will be saved along with the classification results. Subsequently, reviewing the result in the AI Review window helps to diagnose the cause of unexpected classifications, and allows you to submit any specific incorrect result to us for future improvement of our algorithms. These images are stored for one day before being automatically removed.
Show software update notifications
When a new update becomes available, you'll see a notification with the option to install it. All updates require your approval - nothing is installed automatically.
Suspend video decoding when not needed
With this option off, SecuritySpy decodes all incoming video frames, whether or not each one is actually required. The advantage of this is that decoded frames are available at all times, so if images from a camera are suddenly required (e.g. a video window is opened), they will be available immediately. Enabling this option can reduce resource usage, however this may result in a significant delay until decoding can resume and the next frame is available.
To minimise delays, make sure the camera's key frame interval is not set too high (this is the frequency of self-contained frames in the compressed video stream, otherwise known as the I-frame interval, I-frame rate, GOV length or Intra frame period). A good setting is around three times the frame rate of the stream, which will result in a maximum delay of three seconds (e.g. if the camera is streaming video at 10 FPS, then set the key frame interval to 30).
This option can be especially beneficial if the features that require decoding are infrequently used. These include motion detection, live video display, delivery via the web interface, and recording to disk where SecuritySpy is performing recompression of the video stream.
Play sounds with full speaker volume
When enabled, the computer's main speaker volume will be automatically set to maximum before playing sounds, and then set back to its original volume after the sound has played.
Hiss reduction
When enabled, low-level audio will be silenced, eliminating hiss and background noise from microphones. This is useful for applications such as baby monitoring, where you may be listening to the audio at night, or when multiple cameras are playing audio at the same time.
Mute incoming audio when sending audio to a camera
For cameras that support two-way audio, this option controls whether the incoming audio from that camera is muted whenever you are sending audio to that camera. This prevents a feedback situation where audio can pass from the Mac's microphone to the camera's speaker, to the camera's microphone, to the Mac's speaker and back to the Mac's microphone in an infinite loop.
Two-way audio source
This defines an audio input source connected to your Mac that is to be used for computer-to-camera audio transmission.
Date format
Choose your preferred date format, which is used whenever a date is displayed (e.g. in timestamps on video frames, and in file names).
Motion thumbnail crop
This adjusts the crop that is applied when generating images for iOS notifications and movie thumbnails displayed via the web interface and iOS app: tighter crops are more "zoomed in" to the area of motion, while wider crops show more of the surrounding area.
Password for settings changes
This password will be required for any attempt to access settings or disarm cameras. It is also advisable, in the Security & Privacy system setting, to set the Mac itself to require a password after a short time of inactivity. While this doesn't completely prevent physical tampering with the computer, these basic precautions provide a useful first layer of protection.
Password to exit full-screen mode
This password will be required to exit full-screen mode.
Password for quitting
This password will be required to quit SecuritySpy.
Settings - Display
This section allows you to choose options for live video display, and configure groups of cameras that can be displayed via their own Group Windows. For large installations, organising the cameras into logical groups in this way makes working with them much more manageable.

Options - Float video windows over other applications
When enabled, all of SecuritySpy's video windows (the All Cameras window, Group windows and individual-camera video windows) will appear over the windows of other applications, even when SecuritySpy is in the background.
Options - Remember positions of Camera Control windows
By default, Camera Control windows open at the current mouse cursor position. Enable this option to maintain their position instead.
Options - Draw red box around moving objects in video windows
When motion detection is enabled, and there is a moving object in any camera's video image, a red box will be drawn around the moving object in the camera's live view in all video windows.
Options - Go full screen at launch and after inactivity (kiosk mode)
When enabled, SecuritySpy will default to full screen mode whenever it is opened, and after a short time of user inactivity, which ensures a constant full-screen display on your monitors.
Options - Reduce live video display frame rate
By default, SecuritySpy displays video frames from all cameras at maximum rate. This may overload the GPU on slower Macs or when displaying many high-resolution, high-frame-rate cameras. If you notice uneven live video, enable this option to ease the load on the GPU by reducing the rate of the live video displays.
Info bar in video windows
The info bar at the top of each camera's view shows various details like the camera name, incoming video frame rate, display frame rate, audio indicators, armed modes, and recording status. This option allows you to choose the size of the info bar, or turn it off completely.
Close windows automatically
This function offers a choice of which windows to automatically close, after the specified period of user inactivity. Closing windows (particularly video windows) reduces resource usage and minimises clutter.
Framing
In video windows, each camera is allocated a rectangle in which to show its image, and this rectangle may not match the aspect ratio of the video being delivered by the camera. To display each camera at its correct aspect ratio, you can choose to use black bars at the top/bottom or left/right edges, or you can choose to crop the image so that it fits perfectly inside its allocated rectangle without black bars. As a third option, you can choose to stretch the video to avoid the need for either cropping or black bars. Mild cropping or stretching both result in a more visually pleasing look than black bars, especially when there are cameras with varying aspect ratios.
Divider line thickness
Lines are shown between adjacent camera views in all video windows and in full screen mode - this option specifies their thickness.
Display quality
There are often large differences between the size of the source images and the size at which they are displayed on the screen, so a scaling algorithm needs to be used in order to prepare the images for display. This quality setting determines the sophistication of this scaling algorithm: the higher the setting, the better the images will look (less jagged with more preserved detail), but the greater the processing load on your Mac's GPU. Activity Monitor can be used to determine whether the GPU is overworked or whether it has spare capacity.
Instant video replay buffer
This feature keeps a buffer of recent video frames in memory for each camera, which is then available for replay at any time in video windows. Note that specifying a long duration here can use significant RAM. See Live Video for information on how to use this feature once it has been enabled here.
Full screen mode screens
By default, SecuritySpy's full screen mode uses all attached screens, but you can use this setting to exclude certain screens.
Groups
Here you can add, configure and remove camera groups. Groups are useful for organising large numbers of cameras into logical subsets, and are used across the software (for example in Group Windows, when setting schedules, and via the web interface) to conveniently work with subsets of the full list of cameras.

Display type
Choose how you want cameras to appear in Group Windows:
Display cameras in grid - just like the All Cameras window, the Group window will display all its member cameras at once, in a grid arrangement.
Cycle between each camera - this option will display one camera at a time, sequentially.
Cycle between groups of four cameras - this option will display four cameras at a time, sequentially in groups of four.
Cycle time
Specify the number of seconds between cycles, when using either of the Cycle display options.
Cameras
Simply enable the checkbox next to each camera you want to include in the group.
Settings - Scheduling
Scheduling is the method by which recording and actions are automatically turned on (armed) or turned off (disarmed) at specific times (see Recording and Schedules for more information).
Schedules define times of the day/week when a function like recording should be armed and disarmed, while Schedule Presets allow you to easily apply sets of schedules to sets of cameras, either manually or automatically.

Settings - Scheduling - Schedule
Schedules define when camera modes should be armed and disarmed throughout the week. All schedules created here will be available to all cameras, and can be used to arm their continuous-capture, motion-capture and action modes independently.

Times when camera modes will be armed are represented as red "time objects". Each time object has a start and end time, which define when the camera will be automatically armed and then automatically disarmed. Click and drag to create new time objects, or to move or edit existing time objects. To remove a time object, select it and press the delete key on the keyboard.
In the above example, the camera will be armed during office hours on weekdays only. SecuritySpy doesn't need to be running before the start time of a time object — if you launch it at any time marked red on the schedule, all camera modes using the schedule will be armed automatically.
Settings - Scheduling - Schedule Preset
A schedule preset defines a set of schedules that will be applied to your cameras when the preset is invoked. For example, a "Home" and "Away" preset can define different sets of schedules to use when a property is occupied vs. when it is empty.

For each camera, you can define a schedule or you can specify "No Change" to indicate that a particular camera's schedule should not be changed when the preset is applied.
Schedule presets can be invoked manually from the Control menu, web interface or iOS app, or automatically via the specified Home trigger - see Apple Home / Home Assistant Integration for more information.
Settings - Scheduling - Advanced
From the Scheduling settings page, click the Advanced Options button to configure some additional options for schedules, as follows:

The options allow you modify the built-in sunrise/sunset schedules so that recording starts a certain number of minutes before or after sunrise or sunset. For example, if you want recording to start 5 minutes before sunrise, then you should set the Sunrise offset time for the Armed Sunrise To Sunset schedule to -5.
Determining sunrise and sunset times requires accurate location and time information. If you plan to use these schedules, check the Date & Time system settings panel to make sure your Mac's location and clock are set correctly.
Settings - Storage
This section allows you to manage storage settings for captured files.

Primary storage location
This is the main location used to store recordings. All cameras will use this location by default. However, individual cameras can be assigned their own storage location under Settings - Cameras - Setup, which overrides this global setting.
The ideal drive type for the primary storage location is an SSD, although a fast HDD can also work well. Do not use Fusion drives (combined SSD+HDD) or NAS (Network Attached Storage) as the primary storage location.
By default, the primary location is ~/SecuritySpy/Captured Files/ within your Home folder on the system drive. However, the system drive is not the best storage location; it's much better to use an external drive connected by USB or Thunderbolt, as this offers more storage space, avoids wear on the Mac's internal drive, and avoids conflicts with other applications. To determine the ideal size and type of storage for your system, use our System Requirements Calculator.
Archive storage location
Files are moved from the primary to this archive location based on the Archive mode setting. In all modes, if the primary location is unavailable, the archive is used as a fallback for direct recording.
- Move files when primary is full — as the primary location fills up, files are moved from the primary to the archive. The total storage space is the sum of both drives. This mode requires the Auto-remove by space option to be enabled.
- Copy files immediately when complete — files are duplicated to the archive as soon as they finish recording. This provides redundancy: if the primary drive fails, all completed files are still available from the archive. The total storage space equals the capacity of the larger drive.
- Fallback only — no archiving takes place; the archive storage location is used purely as a fallback in case the primary is unavailable.
The ideal drive type for the archive location is a single HDD or HDD RAID array connected by USB or Thunderbolt; these offer large storage capacities at reasonable cost. The archive location cannot be the system drive or the same drive that is set as the primary location.
Archived files remain accessible via all the usual interfaces (Browser, web interface, mobile app).
Auto-remove by space
This function removes older files when free disk space drops below the specified thresholds. If an archive location is set, files are first moved there when the primary location fills up. Then, when the archive location fills up, older files at the archive location are deleted permanently. If no archive location is set, older files are permanently deleted from the primary location when it fills up. The automatic thresholds, which should work well for most disks, are set at 8% total disk capacity for the system volume and 2.5% for other volumes.
Auto-remove by age
When enabled, captured files older than the specified number of days will be permanently deleted, no matter which storage location they reside at.
Exclude from deletion
Prevents files with specified tags from being automatically deleted, even if they meet the deletion criteria. Files can be tagged using the Browser or web interface. Tagged files will still be archived if an archive location is set.
Volume mount timeout
When SecuritySpy starts up it attempts to mount any disk that contains a camera's custom storage location. This can take some time, depending on the type of disk and its current state. This option allows you to specify a maximum time that SecuritySpy will wait; if the disk is still not available after this time, SecuritySpy will switch to the default location on the system volume (~/SecuritySpy/Captured Files/). When the disk containing the custom storage location subsequently becomes available, SecuritySpy will automatically switch back to it.
Usage warning threshold
If the available space on any volume used by SecuritySpy drops below this threshold value, a warning will be generated. This warning is written to the log file (available from the File menu), and will also be emailed to the address specified in the Email Settings for error/warning notification emails. To disable these warnings, specify zero for this value.
Settings - Compression
This section allows you to specify the video and audio compression that will be performed for any camera where encoding is required. This applies in the following cases:
- Local devices, such as USB, Thunderbolt, and built-in FaceTime cameras, supply uncompressed video, which needs to be compressed by SecuritySpy for recording to movie files.
- Network devices supply compressed video, and by default SecuritySpy will record this directly to captured movie files. However, for any camera for which you have enabled the Recompress video data and/or Recompress audio data options in the Cameras - Device settings, its video and/or audio data will be compressed by SecuritySpy using the encoding options set in this section.
For a camera that is supplying H.264 or H.265 video data, for optimum quality and performance, you should not enable the Recompress video data option in the Cameras - Device settings unless you have a specific reason to do so (e.g. to allow SecuritySpy to add a date/time overlay on the video stream if the camera is incapable of doing this).
Limiting the use of audio recompression is less important, as this involves less resource usage than video recompression. Ideally, your cameras should be set to supply AAC audio data, but for any camera that cannot, you might want to set SecuritySpy to re-encode to this format. The advantage of recording AAC audio is that MP4 movie files can be created (rather than MOV movie files), which are much more compatible for playback by web browsers. If you don't need to view captured files in web browsers, then it's best to leave the Recompress audio data option turned off.

Movie files - Video codec
Choose between the following video compression codecs:
ProRes: Apple's high-quality intermediate format. Due to its high bandwidth, and the fact that iOS does not support it, this format is not suitable for CCTV purposes, but we have included it as it's a great format for other uses, especially when further editing/processing will be performed.
JPEG: Produces high-quality video and is fast to compress, so performance with this codec is very good, however the size of captured movie files will be large.
H.264: An efficient codec that produces small file sizes. Most Macs have some ability for hardware-accelerated H.264 encoding, therefore this is the optimum format to choose for most purposes.
H.265: A very efficient codec, up to half the data rate of H.264. Hardware-accelerated H.265 encoding support was introduced by Apple in 2017; on older Macs, H.264 should be used instead, as using H.265 on these older Macs can cause very high CPU resource usage.
In order to create MP4 movie files that play back in web browsers, use either H.264 or H.265.
Movie files - Video quality
Higher values result in better visual quality at the expense of larger files; 50 is usually a good balance between quality and data rate.
Movie files - Audio codec
Choose between the following audio compression codecs:
None: Uncompressed audio provides the best quality with the lowest CPU usage. Since the data rate of audio is generally much lower than that of video, unless you require very small file sizes, using no audio compression can be a good option. If you choose this option, you should set a low sample rate and mono audio in order to minimise the data rate (these options are set independently for each device, via the Cameras - Audio settings, or in the camera itself).
Apple Lossless: This gives quality equal to no compression (since it is a lossless codec), at roughly half the data rate, and is reasonably quick to compress.
µ-Law: A very efficient codec designed specifically for compressing speech quickly at a very low data rate (64kbps), but low quality.
AAC: High-quality audio at low data rates. Use this option if you need SecuritySpy to create MP4 movie files that play back in web browsers.
Movie files - Audio quality
For the AAC codec, you can set a quality level, which will determine the bitrate of the encoded audio data. A value of around 50 gives good quality audio at an efficient bitrate.
Still images, email attachments, web streams
This option allows you to set the quality level that will be used for these specific functions of the software. Higher values result in better visual quality at the expense of higher data rates and larger files; 50 is usually a good balance between quality and data rate.
Still image files will always be saved in JPEG format. For email attachments and web streams, the codec used will vary: email attachments will use H.264 for movies or JPEG for images, while the codec used for web streams is decided by the web browser.
Settings - Uploads
This section allows you to specify settings for FTP uploads to remote servers, which is useful for off-site backup of footage. The same FTP server with different paths may be used for different upload destinations, so one camera can be set to upload to a particular directory on the server and another camera to a different directory on the same server. To check directory paths and download or delete files, you will need to use a graphical FTP client utility such as Cyberduck.

Each server has the following configuration options:

Protocol
Choose from the following protocols:
- FTP: this is the standard unencrypted file transfer protocol. It is widely supported and reliable, however being unencrypted is not as secure as the following two protocols.
- FTPS: sometimes called FTP-SSL, this is the secure encrypted version of the FTP protocol. Unfortunately it is not very widely supported.
- SFTP: sometimes called SSH File Transfer Protocol, this is a widely-supported secure file transfer protocol that provides secure encrypted communication. This is generally the one to use when you want encryption.
- Amazon S3: the Simple Storage Service provided by Amazon and other companies.
Server address
For FTP, this is the hostname (e.g. ftp.example.com) or IP address (e.g. 192.168.1.1) of the server.
For S3, this can be left blank if you using Amazon's S3 servers. If, however, you are using a different S3 cloud storage provider (e.g. Backblaze B2), you will need to enter the S3 endpoint address provided by your cloud storage company.
S3 bucket
Enter the S3 bucket name here (this setting is only available if you have selected S3 as the protocol).
Path
For S3, this is the path within the specified bucket where the file should be uploaded to.
For FTP, If you specify a path that starts with a forward slash character, this denotes an absolute path from the server's root directory. A path that does not begin with a forward slash character denotes a relative path from the default directory. The default directory depends on the server - generally each user has a folder on the server which is used as the default directory and set automatically by the server when that user logs in.
For example, consider the following directory layout:

If you were to log in as user1, the server will most likely set the initial directory as /pub/user1/. In this case, to have images uploaded to the user1 directory, you could either leave the path field empty, or you could specify "/pub/user1/" to be explicit. To have images uploaded to the "images" folder within the "user1" folder, you could specify either "/pub/user1/images/" or simply "images" for the path (in all cases it doesn't matter whether you put a forward slash at the end of the path or not). Generally, you should let the server decide the default directory and use a relative path, unless you have a specific reason to use an absolute path.
If the specified directory does not already exist on the server, SecuritySpy will create it.
Append camera name to path
Enable this option to automatically append camera names to the server path, so that each camera will upload to a separate folder on the server.
Append day folder name to path
Enable this option to automatically append day folder names to the server path, so that files for each day will be placed in separate folders on the server. Day folder names comprise the date when the file was created, in the format YYYY-MM-DD.
Local File System Copy
The Local File System Copy option in the Protocol menu can be used to copy files to a drive attached to your Mac, rather than to a remote server. Paths to folders on the local file system typically start with /Volumes/VolumeName/… to refer to a folder on an attached volume, or /Users/UserName/… to refer to a folder within your user directory — drag a folder from the Finder into the Path box to have the path filled out automatically.
Status
To see the status of current uploads at any time select Uploads from the Window menu.
Settings - Email
This section allows you to specify settings for sending emails:

Motion-triggered emails - Subject text
This is the subject field that is used for emails triggered by motion detection. If you leave this blank, a subject will be created automatically. When specifying a custom subject, you can use the placeholders +d for the current date and time, and +n for the camera name.
Motion-triggered emails - Media attachment
This defines the method by which video frames from cameras are attached to motion-triggered emails: choose between a movie file or multiple still images. Generally, the movie file option provides a better viewing experience, as long as your email client supports it.
Motion-triggered emails - Maximum resolution
Attached video frames will be scaled down to this size, in the case where a camera provides higher resolution. This ensures that data sizes of emails remain reasonable, speeding up delivery while reducing the likelihood of rejection by the receiving mail server.
Motion-triggered emails - Number of frames per email
For motion-triggered emails, this defines how many video frames to include in the email. These will be packaged into a single movie file, or attached as individual images, based on the Media attachment selection above.
Motion-triggered emails - Image capture rate
This defines the frame rate at which images are added to motion-triggered emails.
System Emails - Recipients
You can opt to receive three kinds of system emails: error reports, summaries of daily activity, and offline alerts. These will be sent to the email address(es) specified here. You can enter multiple recipients, separated by commas.
System Emails - Error reports
These emails notify you when a problem occurs. Use this setting to choose which severity levels trigger an email: all errors and warnings, errors only, or critical errors only. In all cases, all errors are written to a log file that you can access from the File menu in SecuritySpy.
System Emails - Summaries of daily activity
When enabled, SecuritySpy will gather various statistics for each day, including the number of files created, the amount of data recorded, and camera uptime. At midnight, a summary report will be generated. This is useful for quickly confirming that your system is performing as expected.
System Emails - Alerts when this system goes offline
Use this feature to receive email notifications when a problem causes SecuritySpy to stop running. This is useful if you want to run SecuritySpy continuously with no downtime. The feature works by sending frequent "heartbeat" messages to our server - if these messages stop, our server will send you warning emails. Assuming you have taken the steps outlined in the section Setting up SecuritySpy for Autonomous Operation, SecuritySpy should be running all the time, and any significant period of downtime could be the result of a software error, disk failure, computer problem, power outage, or Internet disconnection. If your system goes down, you will receive a warning email after 20 minutes, then 1 hour, then 6 hours, then daily for 5 days.
Email sending method
By default, SecuritySpy will use its own email relay service, which requires no configuration. This service is provided by us, and its usage is free for all SecuritySpy users (though we do limit the size and frequency of emails in order to ensure good performance for all users).
The other option is to use your own SMTP server, in which case further configuration is required, as follows:
SMTP server address
The address of the server used to send mail. This is normally provided by your ISP (Internet Service Provider).
If your server uses a non-standard port, you can specify this here using a colon and then the port number. For example, if your server uses port 28, you would enter "smtp.example.com:28". Most SMTP servers operate on standard ports (25 for non-encrypted communication and 465 for encrypted SSL communication), so if you have not been told by your ISP to use a particular port, don't specify a port number and the standard one will be used automatically.
The small pop-up menu to the right of this field contains a few presets for common email accounts; select one and the server address any any other appropriate settings will be set automatically.
'From' address
This is the return address sent with emails to identify the sender. You should always use a valid email address here, as spam filters will block messages without one. Also, many SMTP servers will not accept just any return address: usually it must be from the same provider as the SMTP server.
'From' name
This is the name associated with the return address. It is optional, however if you don't specify a name here, there is a higher chance of emails being blocked by spam filters.
Username and password
Most SMTP servers require authentication - if yours does, enter your username and password here. The username is typically your email address.
Encryption
You can choose between no encryption, implicit encryption, or explicit encryption (if your mail server uses encryption, it will probably use the explicit method). An increasing number of email servers support encryption (some even require it), however many servers do not support it, and enabling this feature when using such servers will prevent emails from being sent. Therefore, you should check the instructions supplied by the provider of the SMTP server, and enable this feature only if your email server supports it.
Test button
Once you have configured the email settings, you can test them by clicking this button. SecuritySpy will attempt to send a test email, and will report any problems it encounters.
Settings - Web
SecuritySpy features a built-in web server that allows you to view live camera streams, download captured footage, change settings and control the software, all from a remote location over a local network or the Internet.

Enable web server
SecuritySpy includes both a standard HTTP web interface and an encrypted secure HTTPS web interface. Standard HTTP sends and receives data in its raw form, which is suitable for local networks but not safe for communicating over the internet where the data could potentially be intercepted by a third party. By contrast, HTTPS is a secure protocol that employs encryption, making it extremely difficult for someone to decode any intercepted data. HTTPS is therefore strongly preferred for sending sensitive information over the internet, such as passwords and CCTV camera footage.
The HTTP and HTTPS servers each operate on their own network port. A port number represents a "channel" for network communication, and allows different applications on the same device to use the network without interfering with each other. Note that on macOS, it is not possible for an application such as SecuritySpy to use ports below 1024 (unless you specifically run it as a root process, which is not advisable). SecuritySpy's default ports are 8000 and 8001 for HTTP and HTTPS respectively.
From another computer on your local network (LAN), you can access the server with a web browser using the server's IP address and port number, or its Bonjour name and port number, for example:
http://192.168.1.4:8000
https://192.168.1.4:8001
http://mac-pro.local:8000
https://mac-pro.local:8001
When using the DDNS feature in conjunction with the Automatic port forwarding options (see below for explanations of these features), you will be able to access SecuritySpy from the Internet like this:
http://example.viewcam.me:8000
https://example.viewcam.me:8001
Note that local network addresses won't work from the Internet, and Internet addresses may not work from within your local network (depending on your router).
Click the How Do I Access This Server? button to get a list of the addresses you can use to access your SecuritySpy server from your local network and from the Internet. If you need to configure your Mac's LAN IP address, you can do so via the Network pane of the System Settings.
HTTPS Keys and Certificates
Secure servers require a certificate and private key in order to perform the encryption and identify the server. SecuritySpy gives you a few options for this:
1. Automatic: SecuritySpy integrates with Let's Encrypt, a free automated open certificate authority, to obtain a valid certificate for you. All you have to do is set up a DDNS name (see below), and SecuritySpy will attempt to automatically obtain a certificate in this name. Make sure to pick a DDNS name that you are happy with, because if you change this in the future, there will be a delay of one day before a new certificate will be obtained in the new name. This is to comply with rate limits imposed by Let's Encrypt on their service.
2. User-supplied: You can purchase an official certificate to use with SecuritySpy. This is useful if you want an official certificate but don't want to use SecuritySpy's DDNS feature (e.g. you have your own domain name that you want to use instead). In order to use a certificate obtained from a certificate authority, first you will need to generate a private key and a certificate signing request (typically using OpenSSL via the Terminal - instructions should be provided by the certificate authority). You send the certificate signing request to the certificate authority and they send back a signed certificate. Place the private key, main certificate, and any intermediate certificates into the SecuritySpy folder within the Home folder (i.e. ~/SecuritySpy/), and then quit and relaunch SecuritySpy.
When supplying a private key:
- The file name must be server.key
- The key type must be RSA, and the file format must be PEM or binary DER
- The key must have no password requirement.
When supplying a certificate:
- The file name must be server.crt or server.cer
- The file format must be PEM or binary DER.
Intermediate certificates:
- Your certificate may come with intermediate certificates, which make up the "certificate chain"
- If you have been provided with a ca-bundle or fullchain file, place this into the SecuritySpy folder
- If you have a file called chain in addition to fullchain, you don't need to include the chain file
- Otherwise, place all intermediate .crt, .cer or .pem certificate files into the SecuritySpy folder
- Make sure to not include any files that aren't linked to your main certificate.
3. Self-signed: If SecuritySpy is unable to obtain a Let's Encrypt certificate, and you have not supplied a certificate yourself, then SecuritySpy will automatically generate a self-signed certificate. Self-signed certificates provide the same level of encryption as an official certificate, however they do not provide the same level of assurance to the client regarding the authenticity of the server, hence a web browser connecting to such a server will display a warning to this effect. For SecuritySpy however, you are the one setting up the server and so you can be certain about its authenticity, therefore the use of a self-signed certificate for SecuritySpy is entirely suitable, and you can simply ignore the warning displayed by the web browser.
In all cases, the address you use to access SecuritySpy should match the certificate's hostname (e.g. the DDNS name that you have set up), otherwise you will get a warning from the web browser about a hostname mismatch. Therefore, if you are connecting to SecuritySpy's HTTPS server over a local network using an IP address or Bonjour name, you will get a warning about a hostname mismatch, so you may prefer to use the standard HTTP interface for local connections — in this case the traffic is contained within your own local network, so the use of encryption is less important.
Automatic port forwarding
To allow access to SecuritySpy from the Internet, your router must be configured to forward incoming connections to SecuritySpy. Use these options to enable automatic port forwarding for the HTTP and/or HTTPS port. For this to work, your router must support, and have enabled, either NAT Port Mapping Protocol (NAT-PMP), or Universal Plug and Play (UPnP). Almost all routers support at least one of these protocols, but not all have this function enabled by default.
IMPORTANT: when using this feature, your SecuritySpy web server becomes much easier to access from the Internet, so for security you should create a web server account with a strong password to prevent unauthorised access.
Dynamic DNS name (DDNS)
Most Internet connections provide a dynamic public IP address, which can change from time to time. If you want to access your system over the Internet, you will need a static address, which is what SecuritySpy's DDNS system provides. Simply enter the DDNS name you want to use and click the Test button; the indicator will turn green to indicate success or red to indicate a problem (e.g. if the name you requested is not available). Once enabled, the Internet address example.viewcam.me will always point to your public IP address, even when it changes.
IMPORTANT: when using this feature, your SecuritySpy web server becomes much easier to access from the Internet, so for security you should create a web server account with a strong password to prevent unauthorised access.
SecuritySpy uses the server name text (see above) as its Bonjour name. Note that if you have enabled the macOS firewall feature on the computer running SecuritySpy, this may prevent Bonjour from working properly. Therefore you may have to disable the firewall if you want to use Bonjour to connect to SecuritySpy servers. The firewall settings are accessible in the Security & Privacy system settings.
Write log file of all connections
When enabled, SecuritySpy will create a text file containing information about every connection to the web server, including the connection time, the client's address, and the requested page. To view the log, select the "Open Web Log" option from the File menu in SecuritySpy.
Allow Screen Control for Administrator accounts
When enabled, Administrator accounts are allowed to control the Mac's screen via the web interface (just like Screen Sharing or TeamViewer). Due to the level of access that this feature provides, it is only available to Administrator accounts, and is turned off by default. This option is particularly useful if your Mac is running as a dedicated server, as it allows full remote administration of the Mac.
Accounts
To enable password protection to restrict access to your SecuritySpy web server, you must add at least one account; if you don't create any accounts, there will be no password protection. If your SecuritySpy server will be accessible from the Internet, we strongly recommend that you enable password protection.
Geoblock
This feature restricts access to SecuritySpy's web server based on the geographic location of incoming connections. This is useful for reducing unwanted access attempts. For example, if you only expect to access your system from within your own country, you can block all other locations. Click the + button to add countries or continents to the list. Adding a continent (e.g. Europe) covers all countries within it. You can choose between two modes of operation:
- Allow Listed Locations Only — connections from the listed countries or continents are allowed; all other connections are blocked.
- Block Listed Locations — connections from the listed countries or continents are blocked; all other connections are allowed.
SecuritySpy automatically downloads and periodically updates a geographic IP database for lookups. If a lookup fails, the connection is allowed rather than blocked, so temporary problems won't lock you out. However, SecuritySpy must be able to make outgoing Internet connections to obtain and update this database; if it cannot do so for an extended period, a warning will appear in the log. Geoblocking applies only to connections from outside your local network.
Settings - Web - Account
This pane allows you to specify settings for a web server account:

Username / Password
Enter the username and password that will be required to log in with this account. The username is not case sensitive, but the password is; both can be up to 31 characters long.
Live duration limit
If specified, this is the maximum duration of a live media stream that can be viewed when using this account.
Live frame rate limit
If specified, this is the maximum frame rate of a live meda stream that can be viewed when using this account.
Live resolution limit limit
If specified, this is the maximum resolution of a live meda stream that can be viewed when using this account.
Captures age limit
If specified, this is the maximum age of captured files that this account is allowed to access.
Timed daily access
This allows you to restrict access to the web server via this account to certain times of the day.
Permission level
There are a few preset permissions levels, and a fully customisable one, as follows:
Live - the user can access live video/audio from any camera.
Live, Captures - the user can access live video/audio and captured footage for any camera.
Live, Captures, Control - the user can access live video/audio, captured footage, and camera control (Pan/Tilt/Zoom, automations) for any camera.
Administrator - the user has full access to every web server feature.
Custom - under this setting, you can specify which features of which cameras the user has access to. Select the camera(s) for which you want to allow certain actions, and set the permissions accordingly. Select the All cameras option to set permissions that will apply to all cameras — this makes it easy to give a particular user a certain level of access for all cameras, while still being able to apply additional permissions for individual cameras.
Note that the live video and live audio custom permissions apply to live streaming only. The captured footage permission is independent: a user with access to captured footage will be able to view and hear all recordings, regardless of their live streaming permissions.
Accessing SecuritySpy from the Internet
For instructions on how to set this up, please see the Remote Access section of the SecuritySpy Installation Manual.
Settings - Cameras
The Cameras section allows you to add and configure your cameras, and is further subdivided into the following sections: Device, Setup, Detection, Continuous Capture, Motion Capture, and Actions.
Add a camera by clicking the plus (+) button at the bottom-left of this window; a menu will pop up with all available options. New cameras will appear at the bottom of the list; to adjust this, click the gear button below and select Reorder Cameras. The order you choose here will be reflected throughout the software.
The camera list includes status icons that indicate whether each camera is online (●), connecting (⋯), offline with an error (!) or disabled (○).
Settings - Cameras - Device
The Device tab contains settings related to video devices themselves (the screenshot below show the settings available for network devices; for local devices - i.e. those connected by USB, Thunderbolt or built-in devices such as FaceTime cameras - there are many fewer options available as these are plug-and-play devices that don't need to be set up in the same way).

Address
If you have just added a camera, its address may be pre-filled. If not, enter the IP address, hostname, or Bonjour address of the device. By clicking the Discovered Devices button below this field, SecuritySpy will display a list of devices that were discovered on your local network, for example:

Select a device from this list, and the Address field will be automatically populated with the address of the selected device. This menu consists of two sections:
- ONVIF Devices: this section lists all devices located via the ONVIF auto-discovery mechanism. All ONVIF-compatible cameras connected to your local network will be displayed here. By selecting a device from this list, the Address field will be populated with the camera's unique identifier string ("UUID"). By referring to cameras by their unique identifiers, SecuritySpy can locate cameras even if their underlying IP addresses change.
- Bonjour Devices: Bonjour is a protocol for auto-discovery and addressing that removes the need to use IP addresses. All Bonjour-compatible devices will be shown here — selecting one from the list will populate the Address field with the Bonjour address of the device.
Both the above addressing methods remove the need to configure your cameras with fixed IP addresses: for a camera that obtains an IP address automatically via DHCP (which is usually the case), setup is simply a case of connecting it to your network and selecting it in the above list.
Many cameras support both ONVIF and Bonjour, so you may see two entires in the list for such devices; in this case you can select either (though using the ONVIF address may be slightly faster and more reliable in some circumstances).
In this menu, you will see a check mark (tick) next to devices that have already been added.
HTTP/RTSP ports
These are the network ports that SecuritySpy uses to communicate with the device. The standard ports are 80 for HTTP and 554 for RTSP. If your device uses standard ports (most do), you can leave these fields blank, but if it uses non-standard ports, you should enter them here.
You can also choose to enable SSL, which is a protocol that provides secure encrypted communication with network devices. For devices that support this feature, SSL provides additional security by preventing the decoding of intercepted data streams. It can therefore be useful when transmitting data over the internet, but is typically not required when transmitting over a local network (and, in fact, may prevent local network communication due to certificate validity issues). In order to use SSL, the device should be set up with a valid SSL certificate that matches the address that you enter into the Address field in the above window.
Username / Password
If the network device requires authentication, enter its username and password here.
Profile
Most modern IP cameras support the ONVIF protocol, which is a universal way of connecting to devices. So, if your camera supports this, then you should use the ONVIF profile in SecuritySpy. Alternatively, SecuritySpy has many profiles designed specifically for individual camera makes and models, so check this list to find one to match your device. Or, if you want to enter the HTTP/RTSP streaming request yourself, use the Manual Configuration option.
Format
This menu lists the available formats supported by the device, which will be a combination of the following:
-
Video compression codecs
- JPEG - the simplest codec, which will give you low resource usage but large file sizes.
- H.264 - a very efficient efficient codec; a good balance between complexity and bandwidth.
- H.265 - the most efficient codec; the best one to use if supported by your camera.
-
Network transport protocols
- HTTP - typically used to stream JPEG video; does not support audio.
- RTSP - designed for video, and typically used for H.264 and H.265 streaming; has support for both video and audio streaming.
- RTSP-over-HTTP - this has the advantages of both above formats, in that it is designed for video streaming, supports both video and audio, and is easily transmitted across the internet along with standard web traffic.
If you are connecting to a camera over a local network, then the H.264/H.265 RTSP formats are typically the best ones to use. If connecting over the internet, then the H.264/H.265 RTSP-over-HTTP format are most appropriate, if supported by your camera.
Video size
Enter a video size (resolution) to request from the device. If you leave these fields empty, the device will normally supply its maximum size, which is what we would recommend in most circumstances. This setting is available for most ONVIF devices.
Frame rate
Enter the rate at which you want the device to send video frames. For general-purpose CCTV, we recommend a frame rate of around 10fps. This setting is available for most ONVIF devices.
Quality
Choose a video encoding quality - higher quality settings provide better visual appearance, but require more bandwidth, resulting in higher network usage and larger recorded file sizes. This setting is available for most ONVIF devices.
Input/stream number
For devices that have multiple inputs or streams, here you can specify the one you want to use. For example, some devices have multiple physical inputs or image sensors, while others have multiple streams with different compression settings. This option will only be available if this feature is supported by the device.
Manual profile path
This setting is available when you select Manual Configuration as the profile. This is the text that is sent to the device to instruct it to send media data. This setting is useful if you want to use a network device that doesn't support ONVIF, and isn't supported under an existing profile. Consult the documentation or manufacturer of your device for information about the format of RTSP requests it understands.
When camera manuals specify this information, they typically do so in the form of a URL, like this:
rtsp://address:port/path
It's specifically the path part that needs to be entered here. If a port is also specified, make sure to also enter this in the RTSP Port box.
Options - Recompress video data
Network devices supply video data in compressed formats (typically H.265, H.264 or JPEG). By default, this data is captured directly to recorded movie files, ensuring optimal quality and minimal resource usage. Instead, if you enable this option, the video data will re-encoded for recordings. This is necessary if you want SecuritySpy to apply a text overlay, a transformation (rotation/flip), or a privacy mask (to obscure sections of the image), or if you want a more space-efficient format for recordings. Where possible, it's recommended to apply text overlays, transformations and privacy masks directly in the camera settings rather than in SecuritySpy, avoiding the need for recompression.
Options - Recompress audio data
Network devices supply audio data in compressed formats (typically G.711, G.726, AMR or AAC). By default, this data is captured directly to recorded movie files, ensuring optimal quality and minimal resource usage. However, it may be useful to enable this feature in order to record with AAC audio compression if your camera is not capable of providing this format, because this allows the creation of MP4 files instead of MOV files. MP4 files play back in web browsers, whereas MOV files generally will not, so this is important if you will be viewing recorded footage via SecuritySpy's web interface.
Options - Set device date and time (ONVIF devices only)
When enabled, SecuritySpy attempts to set the camera's date and time every time it connects. This is the easiest way to keep camera clocks up to date. If your camera does not support this, the alternative is to configure cameras with NTP server settings — see Maintaining Camera Clocks for more information.
Choosing and configuring your network devices
Please see the Network cameras section of the SecuritySpy Installation Manual for comprehensive information on this topic.
Settings - Cameras - Setup
This section shows general configuration options for each camera, as follows:

Status - Enable this camera
This allows you to turn a particular camera off without completely removing it from the software. If you turn a camera off it will no longer be used and will not be available for viewing or recording.
Privacy Mask
Draw on the live video image to define a privacy mask. Masked areas will be obscured (filled with black). This feature can also be used to crop the image: where the mask covers an entire edge of the frame, that edge will be cropped instead.
Camera name
This is the name that will be used for this camera throughout the software.
Text overlay
Use this option to draw a text overlay on all video frames. Available placeholders are +s, +n, +d, +w, +m, +t, and \n to represent the system name, camera name, date and time, day name, motion level, time stamp, and line break respectively.
Audio input
Audio from the selected input will be available for live preview alongside the camera's video stream, and recorded to captured movie files. For IP cameras with built-in microphones, select This Network Device. Any other available audio device (built-in, USB, etc.) can be used with any camera.
Transformation
There are several options for transformations that can be applied to the video image, to compensate for the mounting position of the camera (e.g. if mounted upside-down or sideways). The available transformations are: 180° rotation, 90° rotation clockwise, 90° rotation counter-clockwise, horizontal flip, and vertical flip.
Fisheye correction
Some cameras, in particular those described as panoramic or 360° produce fisheye-type images, which are very wide but distorted, with straight lines appearing curved. This feature can correct such images, making them look more natural. There are several correction algorithms to choose from, allowing you to find the one that best fits the type of image that your camera creates:
- Equidistant – distance from centre is proportional to viewing angle; this is the most common type for security cameras.
- Equisolid – preserves relative areas of objects across the frame; common in scientific and meteorological applications.
- Stereographic – preserves shapes and angles; used in specialty lenses.
- Orthographic – image appears as if viewed from infinity; rare.
Fisheye strength
Controls how much fisheye correction to apply to the image.
Brightness / Contrast
These controls allow you to apply basic adjustments to enhance the camera's image.
Storage location
By default, movie and image files are saved to a Captured Files folder, within the SecuritySpy folder in your Home folder (i.e. ~/SecuritySpy/Captured Files/). However, you can customise where SecuritySpy saves files using this setting, by selecting a volume or folder anywhere on your file system. A storage location set here will override the default one set under Settings - Storage.
Shortcuts
Shortcuts allow you to control devices related to a camera, such as turning on lights, unlocking doors or opening gates. Shortcuts defined here will be available in the contextual menus in the software (when you right-click on a camera's image), and from the web interface and iOS app. Types of shortcut are as follows:
- Home - an Action created in HomeHelper, allowing the control of devices in Apple Home or Home Assistant.
- URL - an HTTP GET request will be made to the URL you specify.
- Shell - a command that you would enter in the Terminal app.
Settings - Cameras - Detection
This section offers options for motion detection, object detection (classification) and presence detection. These different kinds of detection can be used to trigger Motion Capture and Actions.

How motion detection works
To understand the settings in this panel, it is useful to first review how motion detection works in SecuritySpy. The process is as follows:
 |
Initially, a lightweight neural network analyses incoming video frames to detect areas of movement. The network is resistant to false positives from snow, rain and swaying plants, while remaining highly sensitive to genuine motion. |
 |
When motion is detected, the image is cropped to just the area of motion, and scaled to a size that can be accepted by the AI object classifier. |
 |
Next, the classifier analyses the cropped image and predicts the presence of humans, vehicles and animals. This is a Convolutional Neural Network (CNN) that has been trained on hundreds of thousands of real CCTV images, allowing it to make highly accurate predictions. |
 |
The classifier predicts the likelihood that a human, vehicle or animal is present. Select which object types will trigger recording and actions under Motion Capture and Actions. |
|
Best results are obtained by using high-quality high-resolution cameras, good lighting, a frame rate of at least 6 FPS, and following the advice under Achieving Effective Motion Detection. On modern Macs, especially those with Apple Silicon chips, the neural networks run extremely quickly, but on older Macs they can use significant system resources. | |
Motion detection area
Draw a mask onto the video image in the panel above to define areas that should be ignored by the motion detection algorithm. This is useful to exclude moving objects that you don't want to generate triggers, such as trees swaying in the wind.
Motion sensitivity
Higher values make the motion detector more sensitive to small amounts of movement, reducing the chance of missed events, but increasing false-positive detections. Lower values reduce false-positives, at the risk of missing real events.
Ignore motion in these directions
If you are interested in movement only in particular directions (e.g. towards a door), this feature can effectively filter out movement in other directions, minimising the number of false-positives.
Presence detection area
This area defines where the "Object Arrives" and "Object Departs" triggers operate. These triggers can be added under Motion Capture and Actions.
This is particularly useful for objects that remain relatively stationary - such as a vehicle parked in a driveway - rather than moving quickly through the frame.
When to perform detection
These settings determine when each detection function is active, as follows:
- Only when required for triggers: active only when needed to trigger Motion Capture or Actions. This option results in the lowest resource usage.
- When any recording is happening: this option ensures that the corresponding detection data is saved to all recordings, enabling future event searches via the Browser.
- Always: useful when detection results are needed beyond recording and triggering (e.g. sending to a third-party application like a home automation system). This option results in the highest resource usage.
Advanced Detection Options
The default parameters should work well in most situations, but this panel allows you to customise some further motion detection settings:

Motion detection method - a choice between the following:
- Standard - uses traditional pixel-based analysis for quick, reliable detection in controlled environments. Performs well indoors, or in stable outdoor settings, with minimal false negatives, but environmental factors like shadows or moving vegetation can result in false positives.
- AI-Powered - uses a deep neural network to deliver superior accuracy, even in challenging conditions, with low false-negative and false-positive rates. Ideal for Apple Silicon Macs, but less suitable for older Intel-based systems, where high CPU usage may be an issue due to lack of dedicated neural hardware.
- Automatic - Apple Silicon Macs will default to AI-powered motion detection for all cameras, while on Intel Macs, SecuritySpy will automatically allocate cameras to AI or Standard methods based on available system resources.
Sensitivity values - higher values make the various algorithms more sensitive to the input in question (motion, AI object or audio). In all cases, higher values will result in more genuine detections (fewer false-negatives) at the expense of more erroneous detections (more false-positives).
Animal definition - if you are using animal detection, this determines which animals will cause a trigger. Note that each additional option you enable here can increase the rate of false-positive detections, so make sure to enable only the options that you need.
Settings - Cameras - Audio
This section allows you to specify the audio settings for each camera:

Audio Source
Choose an audio input device to associate with this camera. Typically, for IP cameras, you will want to use the option "This network device", which indicates that SecuritySpy should take the audio feed from the camera itself.
This menu also lists all available local audio devices attached to your computer (built-in / USB / Thunderbolt), and you can associate any of these audio inputs with any camera.
Channel configuration / Sample rate
If audio is being supplied by an IP camera, you won't get a choice here; instead, audio settings will be decided by the camera.
Otherwise, for a local audio input device (e.g. built-in or USB), you will have a choice here of mono or stereo audio, and various sample rates. Stereo audio doubles the audio data rate, so use this only if you need to. As for the sample rate, for general-purpose CCTV, 16 kHz provides a good balance between quality and data rate.
Recording options
You can choose whether to include audio in continuous-capture recordings and/or motion-capture recordings. By default, both options are enabled.
Settings - Cameras - Continuous Capture
This section allows you to specify settings for the Continuous Capture recording mode:

Movie capture - Capture movie continuously
Enable this option to capture a movie file whenever the continuous-capture recording mode is armed.
Movie capture - Capture rate
This is the rate at which to capture frames to the movie (leave empty for the maximum rate). Note however that if the incoming video is in H.264 or H.265 format, and you have chosen not to recompress the video (see the Device settings), SecuritySpy will be unable to change the frame rate of the video, and it will therefore be recorded at whatever rate is being supplied by the camera.
Movie capture - Playback rate
This feature is useful for capturing timelapse movies, where you can specify a playback rate that is different (usually significantly higher) than the capture rate.
Movie capture - Create new
Here you can specify when to create new movie files - there are four options:
Daily at midnight: a new movie file will be created at midnight each day. All footage captured during the day will be added to the same movie file, even if continuous-capture mode is disarmed and armed during this time.
Hourly (on the hour): a new movie file will be created at the beginning of each hour. All footage captured during each hour will be added to the same movie file even if continuous-capture mode is disarmed and armed during this time. This is a useful alternative to the Daily option above, producing smaller and therefore more manageable files that can be downloaded easily over the Internet.
Each time continuous capture is armed: a new movie file will be created whenever continuous-capture mode is armed, and will continue to be captured to until it is disarmed.
Every x Minutes/Hours/Days: a new movie file will be created at the frequency you specify. Whenever continuous-capture mode is disarmed and then armed, a new movie will also be created.
Movie capture - Upload to
Enable this option to upload all continuous-capture movie files to an FTP server. If the "create new" setting is set to Daily at midnight, movies will be uploaded at the end of the day; otherwise movies will be uploaded as soon as they are finished.
Image capture - Capture images continuously
This feature captures an image file to disk in JPEG format at the rate you specify.
Image capture - Upload to
Enable this option to upload all continuous-capture image files to an FTP server.
Webcam image - Upload and replace image on server
Use this option to periodically upload a JPEG image file with a fixed name to an FTP server, replacing the previous file each time. This is useful for continually updating an image on a web page.
Delete old files
This section contains options for the motion-capture recording Triggers Movie capture Movie capture - Capture rate Movie capture - Pre-capture Movie capture - Post-capture Movie capture - Upload to Image capture Image capture - Frequency Image capture - Post-capture Image capture - Upload to Delete old files
Actions are non-recording options that are caused by triggers, such as alarms and notifications. Triggers Play sound on Mac Play sound on camera For both above options:
Run script Three parameters are passed to these scripts:
If you enter a value here, files that exceed this age will be automatically deleted. This setting applies to Continuous Capture recordings for this camera only, and overrides the global setting under the Storage tab.
Settings - Cameras - Motion Capture

These are the events that will initiate Motion Capture recording. Available triggers include motion, presence ("Object Arrives"/"Object Departs"), audio, camera-generated events, and Home triggers. Parameters for motion and presence detection, which apply to both Motion Capture and Actions triggers, can be configured under the Detection tab.
This function captures movie files in response to the triggers configured above.
Specify the rate at which to capture frames to the movie (leave empty for the maximum rate). Note however that if the incoming video is in H.264 or H.265 format, and you have chosen not to recompress the video (see the Device settings), SecuritySpy will be unable to change the frame rate of the video, and it will therefore be recorded at whatever rate is being supplied by the camera.
This feature captures video from before the trigger. This is achieved by maintaining a buffer of recent video frames in memory, so that when recording is triggered, frames from just before the trigger point are included. This is useful because motion events often include relevant activity that occurs below the trigger threshold.
The number of seconds to continue recording after the trigger ends. A setting of 20 seconds here usually works well - this helps to avoid creating multiple short movies from a single event.
Enable this option to upload all motion-capture movie files to an FTP server for off-site backup. This will happen as soon as each recording is completed.
This function captures JPEG image files in response to the triggers configured above.
Specify the capture frequency in terms of the number of seconds between image file captures.
Specify the number of seconds to continue to capture image files after the motion trigger has stopped.
Use this option to upload all motion-capture image files to an FTP server for off-site backup.
If you enter a value here, motion-capture recordings that reach this age will be automatically deleted. This setting applies to files for this camera only, and overrides the global setting in the Storage section.
Settings - Cameras - Actions

These are the events that will initiate all enabled Actions. Available triggers include motion, presence ("Object Arrives"/"Object Departs"), audio, camera-generated events, and Home triggers. Parameters for motion and presence detection, which apply to both Motion Capture and Actions triggers, can be configured under the Detection tab.
Choose a sound file to play on your Mac. The default sound output device specified in the System Settings will be used to play the sound.
Choose a sound file to play via the camera's speaker. This requires that your camera supports two-way audio.
To create your own scripts, use the Script Editor application that comes with macOS. Place your scripts in SecuritySpy's Scripts folder to make them available to invoke as Actions. To locate this folder, use the menu option at File > Reveal Folder in Finder > Scripts. A few scripts are included with SecuritySpy, including ones that control switch/relay devices that can trigger external devices such as lights and alarms. The built-in scripts work with WebRelay and Web-i IO devices.
Home Action
Here you can select one of the actions that you have created in HomeHelper - see Apple Home / Home Assistant Integration for more information.
Send email to
This feature sends an email, optionally with attached JPEG images, to an address you specify. To send the email to multiple addresses, enter them separated by commas.
Run shell command
Any shell command (i.e. anything you can type into the Terminal on your Mac) can be entered here. Click the popup button to the right of this box for some examples, including:
- HTTP GET request
- HTTP POST request
- IFTTT request (If This Then That)
- Execute a ".sh" Bash/shell script
- Say some words (via text-to-speech)
To issue multiple commands, put them all directly into this field separated by semicolons, or create a ".sh" shell script file. When creating a script file, you will need to set its permissions (just once) to allow it to be run, using the following Terminal command:
chmod +x path/to/script.sh
Trigger other cameras
This setting allows you to trigger recording in one camera based on a motion trigger in another. This could be useful for when you have multiple cameras covering the same area, and want recording to take place in all the cameras when any one detects motion, thereby increasing the chance of capturing something interesting.
Video display - Come to the front and open this camera's video window
If enabled, whenever there is a motion trigger for this camera, SecuritySpy will come to the front, above all other applications, and will display the camera's video window.
Video display - Wake the screen and dismiss the screensaver
If enabled, whenever there is a motion trigger for this camera, all screen(s) will be woken and any screensaver currently running will be quit.
Video display - Highlight camera in red
If enabled, whenever there is a motion trigger for this camera, a red box will be shown around the camera's image in all video windows, for the number of seconds specified.
macOS notification
If enabled, SecuritySpy will generate macOS notifications, which are displayed for a short time in the top-right corner of your screen, and appear in Notification Center.
Maintaining Camera Clocks
Video streams typically include date/time overlays derived from cameras' internal clocks. Keeping these clocks accurate is therefore essential for precisely timing events in recorded footage. There are three main ways of keeping these clocks accurate:
ONVIF time update
Under Settings - Cameras - Device, you will find an option called Set device date and time. This is the easiest way to maintain camera clocks, but requires that your cameras support ONVIF.
Internet NTP server
Using Network Time Protocol, cameras obtain timestamps from an Internet-based NTP server. Virtually all cameras have this feature, configurable via their web-based settings pages. Common servers you could use for this purpose are time.apple.com, pool.ntp.org, or time.cloudflare.com. This requires that cameras are able to make outgoing connections to the Internet.
Local network NTP server
Some network setups prevent cameras from accessing the Internet (see Segregating IP Cameras on their own LAN), in which case you will need a local-network NTP server.
In the SecuritySpy menu (top-left of your screen), you will find the option Install NTP Server. This installs a background daemon that provides NTP services to your network. Then, simply provide the IP address of your Mac as the NTP server address to your cameras.
After installation, test the NTP server by opening Terminal (from /Applications/Utilities/) and entering the following command:
sntp localhost
sntp is a tool that queries NTP servers, and localhost refers to "this machine". The type of response varies depending on which macOS system version you are using, but either of the following responses indicate success:
2021-06-25 08:34:41.206904 (-0100) -0.020317 +/- 0.017639 localhost 127.0.0.1 s3 no-leap
-0.005876 +/- 0.005875 localhost 127.0.0.1
For this solution to work:
- The Mac must have an Internet connection, so that it can obtain timing information from the Internet to pass on to cameras.
- The Mac must have a manually-assigned IP address, or a DHCP reservation in your router, so that its IP address doesn't change.
Licensing
You can purchase a license of SecuritySpy from the SecuritySpy Online Store.
SecuritySpy licenses are available in the following fixed steps of numbers of cameras: 1, 4, 8, 12, 16, 24, 32 and unlimited. Each license can be used on a single Mac only, and licenses cannot be combined (for example, if you have 20 cameras, it is not possible to combine a 16-camera and a 4-camera license; in this case you will need a 24-camera license).
If you purchase now and then need to add more cameras in the future, you can upgrade your license at the SecuritySpy Upgrade Store. The price you pay for the upgrade is simply the difference in price between the license you are upgrading from and the license you are upgrading to; there is no price penalty for buying now and upgrading later.
Any cameras added to SecuritySpy beyond your licensed limit will operate in "view only" mode - you will be able to view live video from these cameras, but no other features will be available for them (recording, actions, web access etc.).
Support / Help
When SecuritySpy encounters a problem, it logs the error and continues to run. If you encounter any sort of problem while using SecuritySpy, check the log to find out more information about what happened. To open the log file, select Open Log from the File menu.
For information about how to choose, install and set up the hardware of your video surveillance system, see the SecuritySpy Installation Manual.
For up-to-date troubleshooting and help, visit the SecuritySpy online help pages.
If your question is not answered in the online help pages, email us at support@bensoftware.com.
To find out which Mac is required for a particular camera setup, see the SecuritySpy System Requirements Calculator.